The Expense Tracker is a simple yet effective tool designed to help you manage and keep track of your daily spending. The app allows users to easily add, categorize, and view their expenses in real-time. With the ability to filter by category, and calculate the total amount spent, the Expense Tracker provides valuable insights into your financial habits. In addition to basic functionality, the app stores expenses in a SQLite database, ensuring that your data is securely saved and easily retrievable. It also features an intuitive interface, allowing users to view their spending history, delete individual expenses, or clear all entries when needed.
Project Details
App Title: NA
Genre: Utility
Platform: PC
Development Tools: Python, Tkinter, SQLite
App Features:
Add, categorize, and describe your expenses
View total amount spent across all expenses
Filter expenses by category
Delete individual expenses or clear all entries
Save expenses to a SQLite database for persistence
This feature allows users to input new expenses into the system, where each expense is defined by its amount, category, and description. Users can also remove individual expenses or clear all records at once.
Implementation
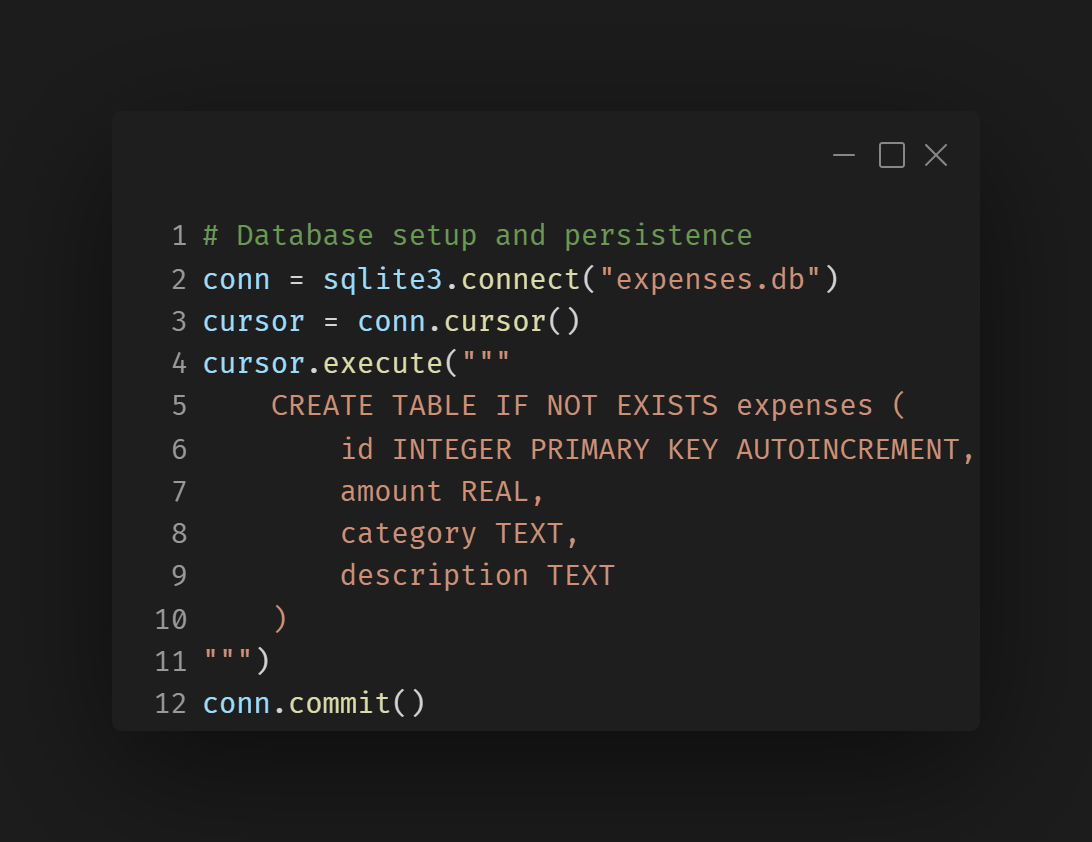
Inputting: A form with text fields allows users to input the amount, category, and description of each expense. On submission, the data is inserted into the SQLite database.
Removing: Users can select an expense from the table and delete it by clicking a button. The selected record is then removed from the database.
Deleting All: A separate button allows users to delete all expenses stored in the database, triggering a confirmation prompt before proceeding.
Design Approach
A simple form layout with text fields for entering expense details. The user interface includes buttons for adding new expenses and deleting selected expenses or all records. A table (using Treeview) displays the list of current expenses.
Click for details
×
Adding Expenses This video demonstrates how users can input an expense by entering an amount, category, and description. Once submitted, the expense is added to the table in real-time, showcasing how new records appear in the list.
Deleting Expenses This video shows how users can remove individual expenses by selecting a record and clicking "Delete Selected." It also demonstrates the "Delete All" feature, where a confirmation message appears, requiring the user to confirm before all records are erased.
Error Handling in Expense Entry This video highlights the built-in error handling for common mistakes. It shows error messages when a user attempts to enter a non-numeric value in the amount field or tries to delete a record without selecting it first.
Input Data
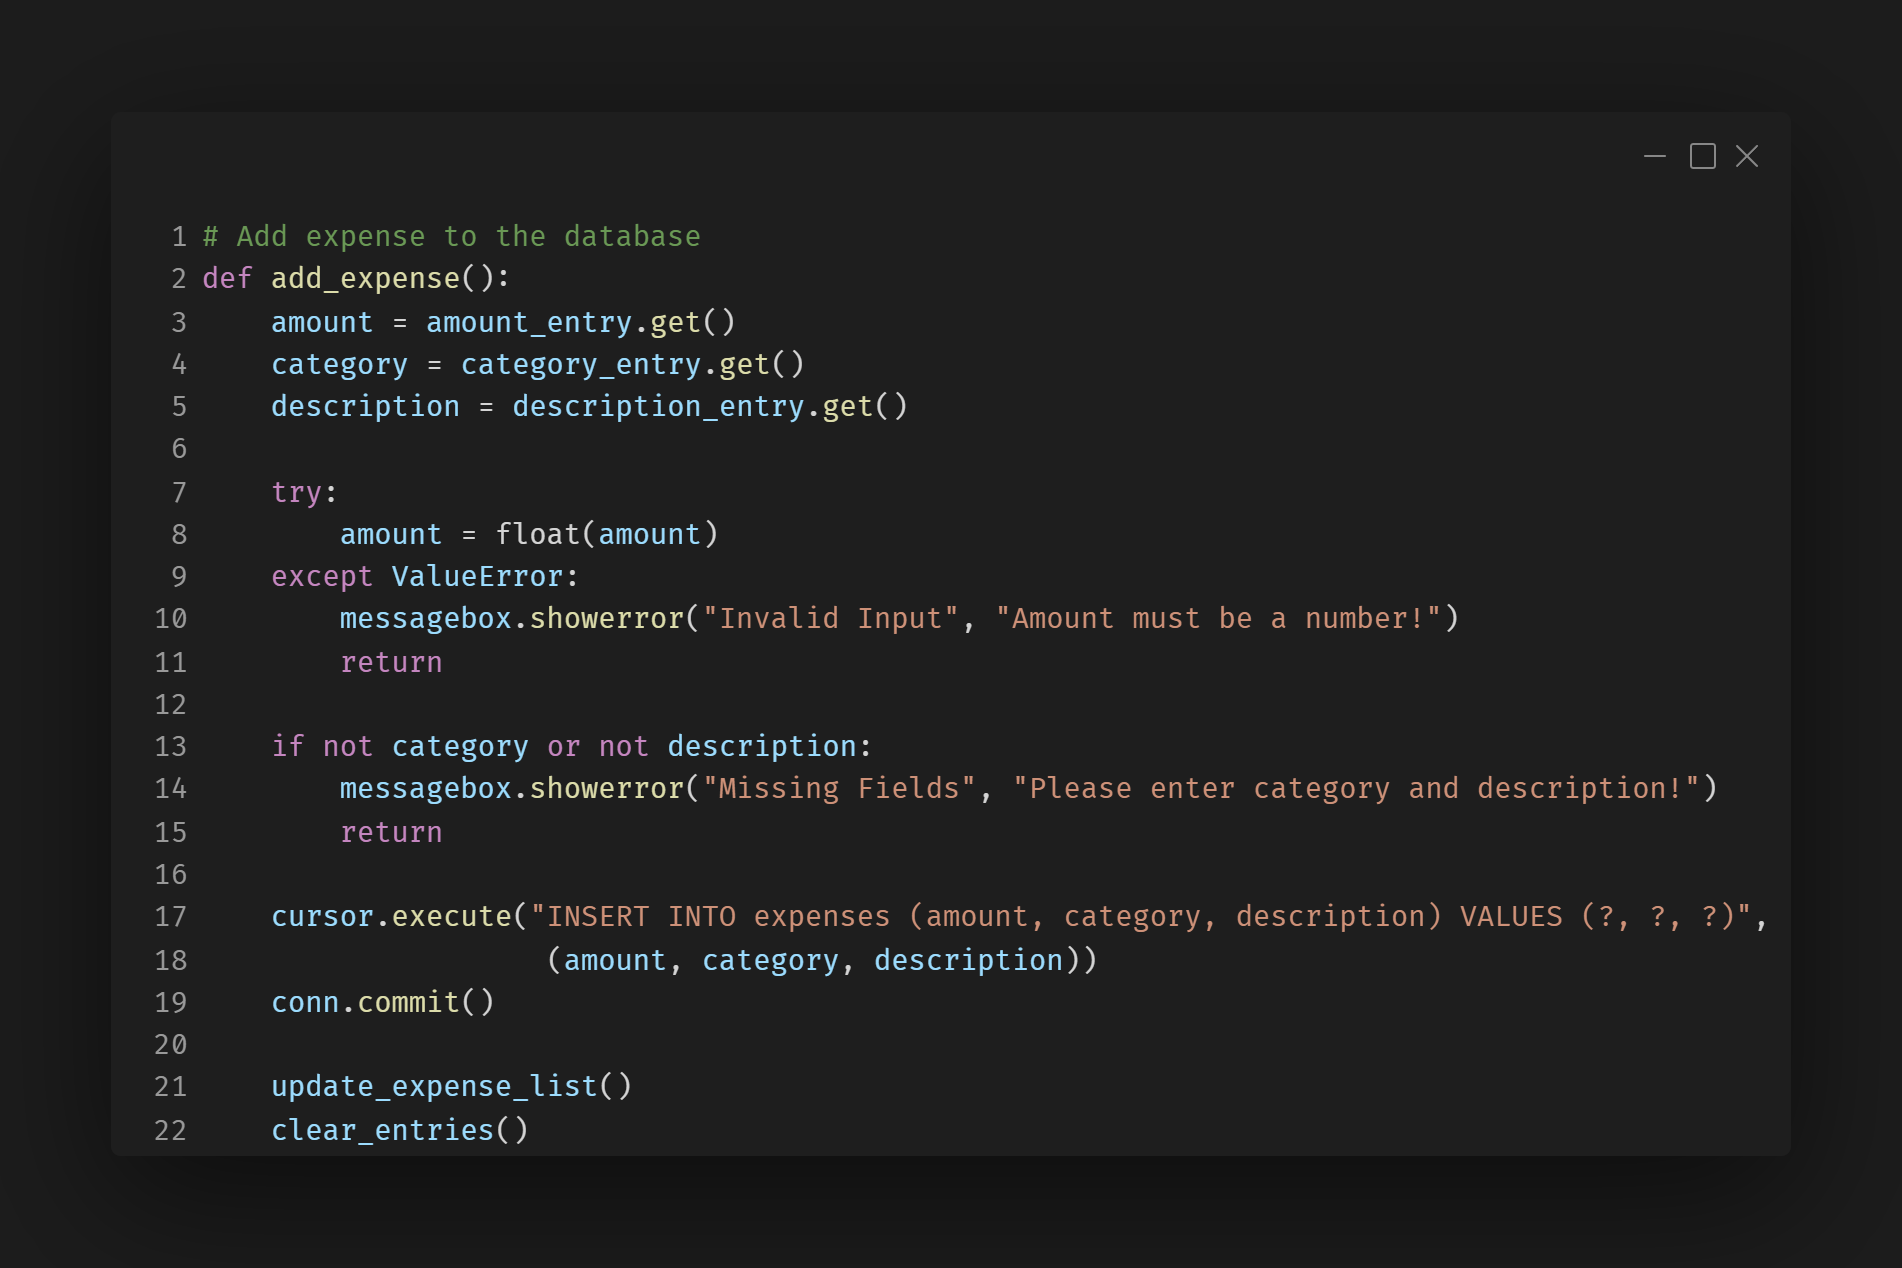
This snippet allows users to add new expenses by entering an amount, category, and description.
Delete Data
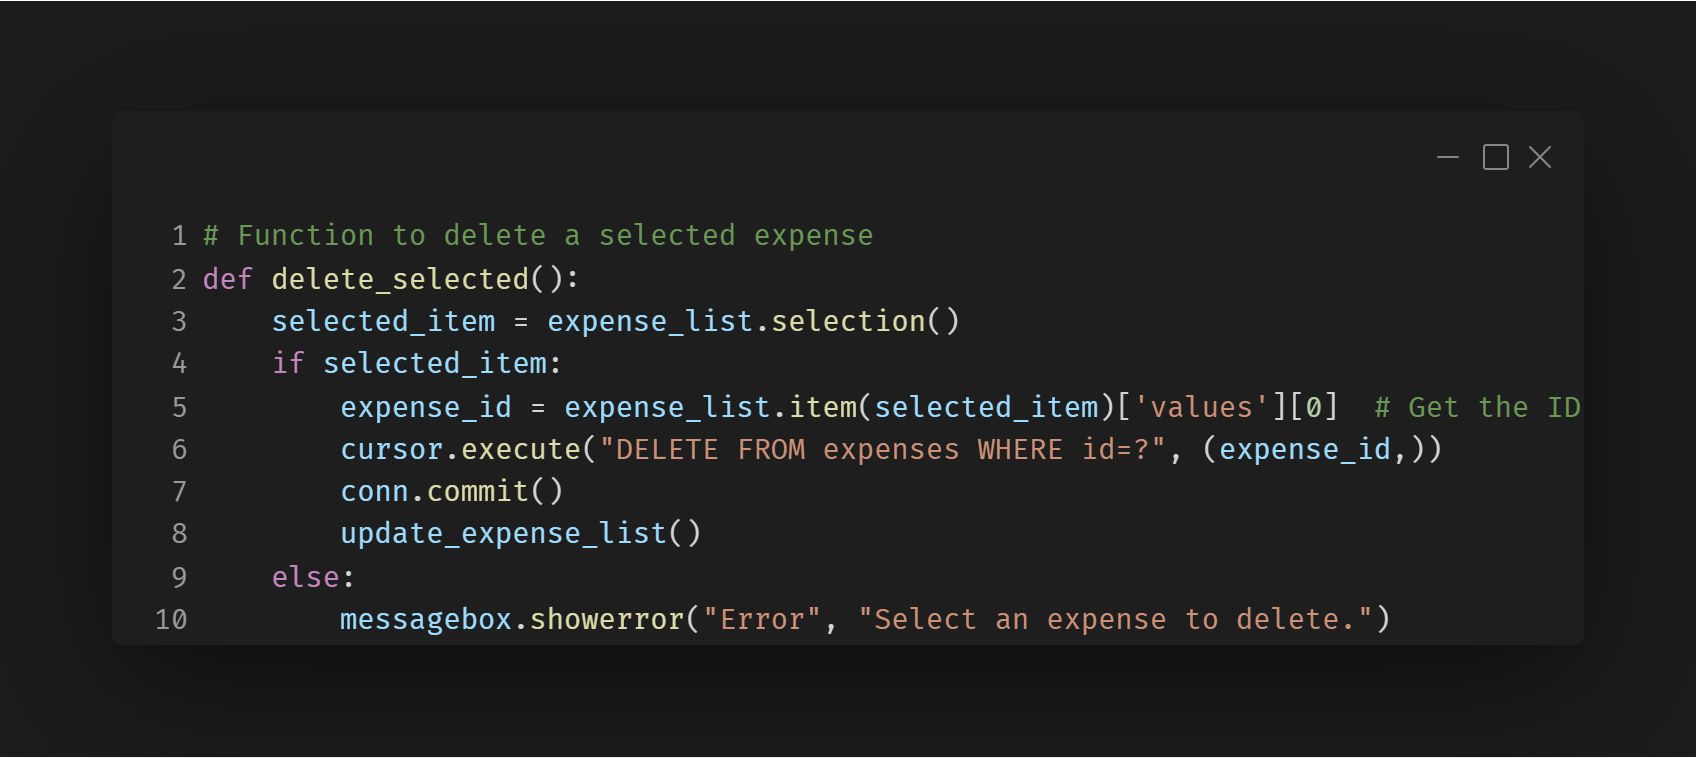
This snippit allows the users to delete individual records removing them from the database
Delete All
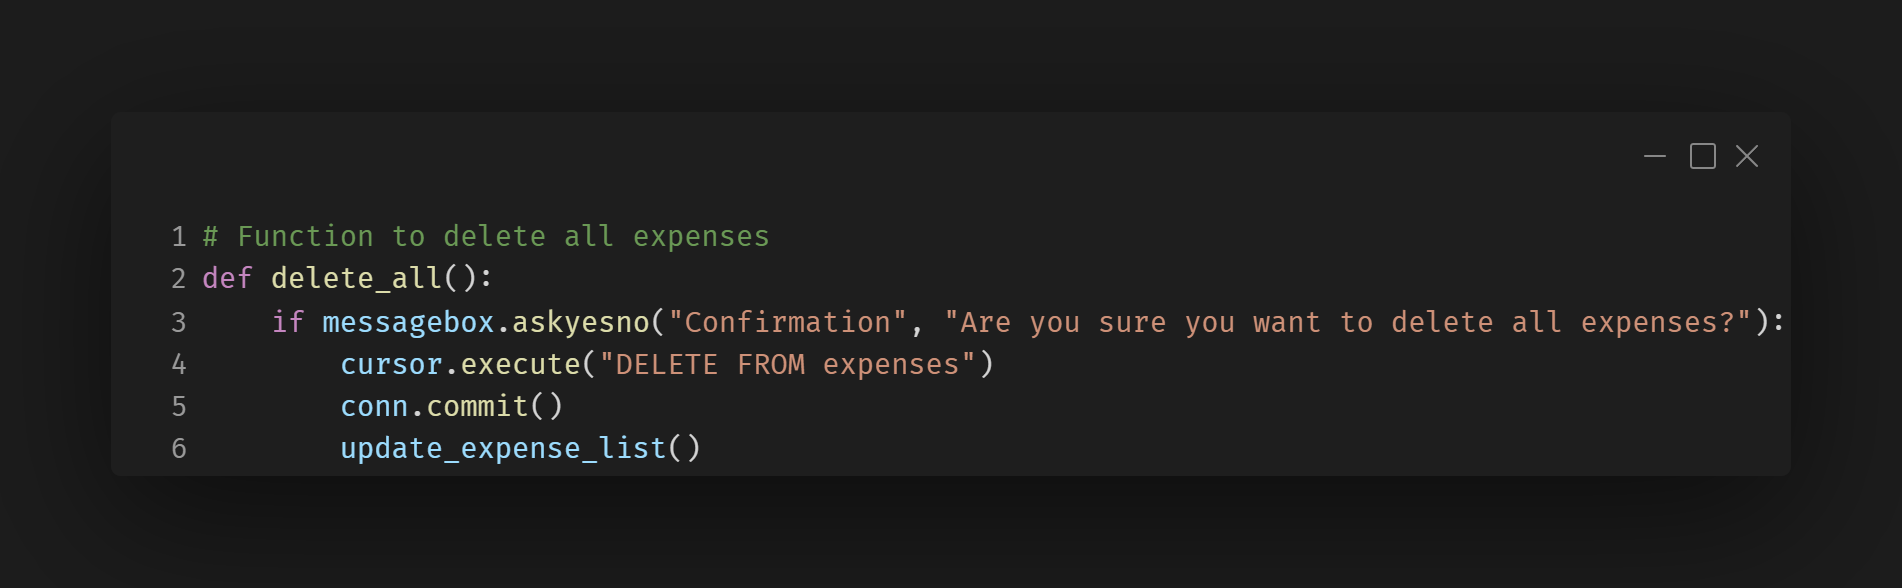
This snippit shows how the user can delete all data in the databse with a confirmation prompt to prevent accidental deleteion of the whole database.
Challanges
Ensuring Data Updates in Real-Time
Challange:
When adding, deleting, expenses, the UI might not update immediately, leading to a stale or outdated display.
Solution:
Use the update_expense_list() function after every database modification to refresh the displayed data.
Description
This feature calculates the total amount spent by summing all the entered expenses. It provides the user with a quick overview of their total expenditure.
Implementation
The total amount spent is calculated using SQL queries that sum the amount column from the expenses table.
Design Approach
A dedicated button labeled "View Total Spent" allows the user to trigger the calculation.
Click for details
×
Total Spent Displays the total spent to the user.
Total Spend Calculation
Shows the total spent.
Challanges
Challange: Handling Empty Database
If there are no expenses recorded, attempting to sum the amounts may return None or cause an error.
Solution:
Ensure that if the database is empty, the total is displayed as $0.00 instead of None.
Description
This feature enables users to filter expenses by category. For example, if a user wants to see only expenses related to food, they can filter by the "Food" category.
Implementation
The app includes a text entry for users to specify the category they want to filter by.
A SQL query is executed to retrieve only the expenses that match the specified category, and the results are displayed in the expense list.
Design Approach
A text field labeled "Filter by Category" allows the user to type a category name. A button labeled "Filter" applies the filter.
Click for details
×
Filter User can enter in a caterogory name to return all the records with the matching name.
Get and Display the Date
This snippet enables users to filter expenses based on a selected category, displaying only the matching records in the table.
Challanges
Case Sensitivity in Filtering
Challange:
Searching for "Food" might not return results if the stored value is "food".
Solution:
Use the LOWER() function to perform a case-insensitive search.
Description
This feature ensures that all entered expenses are saved in a database (SQLite). Even if the app is closed and reopened, the data remains intact, making it easy for users to continue tracking their expenses over time.
Implementation
SQLite is used to store all expense data in a persistent database. Each time an expense is added, it is saved into the database.
Design Approach
The seamless loading and saving of data ensures that users’ data is always available even if they close the app, providing them with a persistent, reliable experience.
Click for details
×
Data Persistence The video shows how the data persists even when the application is closed.
Data Persistence
This snippet ensures that all expenses are stored in a persistent SQLite database, so data remains available even after the application is closed.
Challanges
Resetting Auto-Increment ID Properly
Challange:
After deleting all expenses, the next added record might not reset its ID to 1.
Solution:
Manually reset the SQLite sequence after deleting all records.
What I Learnt
Working with SQLite for Data Management
This project was my first experience using SQLite as a database for storing and managing user-inputted data. I learned how to create tables, insert, retrieve, filter, and delete records efficiently. Understanding SQL queries and ensuring data persistence between sessions was a key takeaway. Additionally, I gained insights into handling auto-incrementing IDs, preventing errors when deleting records, and resetting the database properly when needed.
Building a GUI with Tkinter and ttk
Using Tkinter and ttk for GUI development was a completely new experience. I learned how to structure a user-friendly interface, use Treeview tables to display dynamic data, and implement interactive elements like buttons, input fields, and message boxes. Styling elements and ensuring proper layout alignment across different window sizes were also valuable learning points.
Error Handling and User Experience Enhancements
One of the major lessons from this project was implementing proper error handling. I had to ensure users received appropriate feedback when they entered incorrect data (e.g., non-numeric values in the amount field) or attempted invalid actions (like deleting a record without selecting one). Adding confirmation dialogs before critical actions, such as deleting all expenses, improved the user experience and prevented accidental data loss.
Retrospective
Challenges and Future Improvements
Looking back, one of the biggest challenges was ensuring that the expense list updated in real time whenever a new expense was added or deleted. Initially, changes didn’t reflect instantly, which made the app feel unresponsive. By calling the update_expense_list() function after each database operation, I was able to solve this issue.
Another challenge was managing category-based filtering in an efficient way. Initially, searches were case-sensitive, meaning "Food" and "food" were treated differently. Implementing case-insensitive filtering improved usability.